
Use the Account Translations page to assign district-defined key organizations and accounts to PEIMS funds, functions, objects, organizations, programs, and years. It also allows users to load translations, update multiple records simultaneously, and generate account translation reports.
Refer to the Budget Preparation and Fund Accounting sections for information on Organization Charts.
Menu path
From the main navigation menu, select PEIMS, then Data Exchange (Ed-Fi). From the Other menu, select Account Translations.
Selection rule
The report includes all account translations for the selected year.
Maintain data
You can correct loaded data before generating the report.
-
On the Account Translations page, enter the search criteria and click Search. The fields displayed in the Search Criteria section vary depending on whether the Full Account Structure (FAS) is enabled.
-
To add a record, click Add new. Refer to the Field descriptions, fill out the information, and click Accept.
-
To edit, double-click the record. Update the information and click Accept.
-
To delete a record, select the record and click Delete. Click Yes.
-
Field descriptions
The following table describes the fields in the Account Translations page's Account Information section.
|
Field |
Description |
|---|---|
|
Year |
The year corresponding to the transaction table. This field is display-only and cannot be updated after saving the record. |
|
District Account Number |
The full account number used by the district. This field is displayed when the Full Account Structure (FAS) is enabled. |
|
District Account Number Title |
The title of the full account number used by the district. This field is displayed when the Full Account Structure (FAS) is enabled. |
|
District Key Orgn |
The key organization used by the district. This field is displayed when the Full Account Structure (FAS) is turned off. This field is display-only and cannot be updated after saving the record. |
|
District Key Orgn Title |
The title of the key organization used by the district. This field is displayed when the Full Account Structure (FAS) is turned off. |
|
District Account |
The account used by the district. This field is displayed when the Full Account Structure (FAS) is turned off. This field is display-only and cannot be updated after saving the record. |
|
District Account Title |
The title of the account used by the district. |
|
State Fund |
The state fund. |
|
State Function |
The state function. |
|
State Object |
The state object. |
|
State Organization |
The state organization code. |
|
State Program |
The state program. The drop-down list values are retrieved from the PEIMS Programs Table page. |
|
State Year |
The state year. |
Mass Change
Use the Account Translations - Mass Change page to update PEIMS account translations in bulk based on the selection criteria and replacement values entered.
-
On the Account Translations page, select Mass Change.
-
Select the Year.
-
In the Selection Criteria section, enter the data for the fields you want to update.
Leave the selection criteria blank to update all translations. The fields displayed in the Selection Criteria section vary depending on whether the Full Account Structure (FAS) is enabled.
-
In the Replacement Values section, enter the new values you want to update in bulk.
-
Click Accept, then Yes.
Load data
-
On the Account Translations page, select Load Translation.
-
Select the Ledger Year to Load. This is the year used to build the translation table.
-
If the Full Account Structure (FAS) is turned off, select the Level of Function, Level of Organization, Level of Program, and Level of Year.
-
If the Full Account Structure (FAS) is enabled, select the Level of Function, Level of Organization, Level of Program, and Level of Year for the Expenditure Ledger and Revenue Ledger. Select the Level of Year and enter the Fund Balance Accounts for the General Ledger.
In the Level of Year field, select F if the year is the fund's fourth digit. For information on how Fund Accounting settings map to these Load Criteria, refer to Load data - Example.
-
-
Enter the Fund Balance Accounts.
-
Click Accept.
Load data - Example
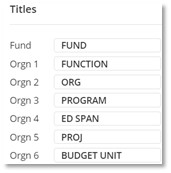
The following image shows the settings on the Titles tab of the Fund Accounting profile.
The following image shows the corresponding Load Criteria to enter on the Account Translations - Load Translation page based on the settings on the Titles tab of the Fund Accounting profile.

Create file
-
On the Account Translations page, select Report.
-
Select the Year and click Accept.
-
Select the Destination for the report:
-
Select File to create the report in .rpt format. The default file name is pemfin1.rpt. You can change the default file name.
-
Select Screen to download the report in .pdf format. The default file name is pemfin1_<xxxxx>.pdf.
-
Select Excel to download the report in .xls format. Select the required Excel Options. The default file name is pemfin1rpt<xxxx_xxxxx>.xlsx.
-
Select OK.
-
Download the .rpt file from the View Files page.
-
Save the .pdf or .xls file.
-
-
-
For detailed information about the report’s file layout, refer to Account Translations - File Layout and Data Mapping.